Replacing a tire is not that big a deal than you might be thinking, the process is very easy but if you have perfect tools it can be done in minutes. Changing the tire by yourself will not only save the bills of the mechanic, but saves you a lot of time. Furthermore, you will also be able to avoid the bills of the Tow truck for taking your vehicle to the nearest repair shop.
You do not have to worry about high end tools. Normal tools can also get your job done and will be a proud situation for you, after you learn the ability to change the tire by yourself. So what tools you are in need to change your tire? Many people change tires of their vehicle for many reasons. Either their home is far from repair shop, or they are stuck in a neighborhood where they cannot find any help.
Many car manufacturing companies gives the tools while purchasing cars, but they are not as smooth as you want them to work. In the household tool box you may already have the tools, but the company tools can be very helpful for you to change the tire. Below you can find a list that you require for changing the tire.
- A Jack Point
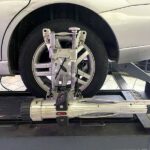
A jack point stabilizes and lifts the car to help you change the tire which is flat. It will go under the car and lift the car up. Then you will have to check the molded plastic on the bottom side of your car. It may have a place to fit the jack. It will take some time for you to find the location but if you do not find it then call the showroom from which you brought the car or see the User’s manual. If you are working at home you could use the scissor jack or Hydraulic jack. Hydraulic jacks are expensive but are better than the scissor jack.
A Lug Wrench or Wheel Brace
Having a Lug Wrench is necessary when you are changing a flat tire. The lug wrench can help you to lose the lug nuts so that you can remove the tire. These types of tools are available in many types such as L-shaped, the spider wrench, and x shaped wrenches. You should have one of these wrenches with your car. Now you should make sure to check the spare tire storage. First, you should check if the wrenches fit your cars lug nut perfectly. You may also need other things as well including duct tape, nuts, bolts, and zip tie. It is used when you don’t get a perfect fit. If you have the new tire than you should use the lug wrench to tight the lug nuts?
Fully Inflated Spare Tire(s)
You should always inflate your spare tire. The first thing that you should worry about is the air pressure of the spare tire and when you are checking that tire check other tires also. The recent models of car manufacturing companies do not provide you spare tires for fuel efficiency and lowering down the cost. If that is the case, simply buy a new tire by yourself and keep it in the car.
Just remember that spare tires are only to take you to the nearest repair shop. These tires are not made for long distance traveling. However, many spare tires of the cars are powerful and you can use them just like normal tires.
Optional:
Wheel Wedges
Wheel wedges avoid the car from falling as you are changing the tire. You have to put it in front when you are changing the rear tire and while changing the front tire you have to put it on the rear. And if you don’t have the wheel wedges then you can use piece of wood or large stones
Steps of Changing the Tire
Step 1: Be Prepared
How to change the tire is the question that everyone needs to know answer to. There are a lot of new cars that don’t come with a spare tire for variety of reasons. So you need to make sure that you have one spare tire wherever you go. It is important to check your tire regularly because a tire with no air is not useful at all as you all know. So you should check the condition and air pressure before you go to any long trips. You need to go with equipments, so that it does not take much time for you to change. If you don’t have tools, you can still change your tire but then you can’t go anywhere because your clothes will be dirty.
Step 2: Pick Your Spot
It is not that easy to get a spot to change your tire safely. You have been careful for choosing the road as it can be dangerous for you and other vehicles. But you cannot drive the car with a flat tire because then you have to buy a new wheel. Once you have chosen the spot then park your car at that stop and start changing the tire.
Step 3: Check and Remove All of Your Tools
This step can be arguable until you have checked the spare tires regularly and the tool kits as well. And if you don’t check the tools regularly, then you have to make sure that the tools are available and correct according to your need.
Step 4: Get the Lugs Loose
Then start by pushing a wheel in an opposite direction of your car so that you can jack up your car. If you don’t have a chock then a rock or piece of wood can do the work. The car will not go or roll anywhere once it is midair. If you are carrying a second person then it will be a very good help because they can be your spotter. Changing the tire in the highway is not a safe thing to do, it can be a risk of life but if you have another person for help, they can be a lifesaver. You have to lay down on the floor and pick up the lug wrench. You should remove all the nut cover which is very simple to do. It may be loss for the first time as it would be hard to remove all the nuts. However, you may need a lug key adapter for that.
Step 5: Jack It Up
Now you will have to find the jack spot or a joint under the car by the tire you are changing. You may now put the jack in the position where the jack handle may point out and then you should rotate it clockwise and the jack will lift up the car. If you will see the light coming from underneath, you are ready to change the tire because now it is high enough.
Step 6: Remove the Tire
After you have removed all the lug nuts you just need to put it somewhere safe. After that you will remove the wheel from the car sometimes it falls off when you are lifting the car with the jack. If it is not falling then you have to kick it and then bring the tire back to the car and keep it inside.
Step 7: Grab the Spare
Now you need to bring out the spare tire. For most of the cars it is placed under the floor, and for the trucks it might under the bed. You now need to put the studs in the holes and push the spare wheel in the position. Next you need to put back all the lugs. Now tight up the lugs with your fingers and do not use wrench yet. Once the wheel is properly placed bring your car to the ground.
Step 8: Lower the Car
You have to turn the jack in the opposite direction so that your car will slowly lower down to the ground. Once it is settled you can take the Jack out of the car and grab the wrench and lug again.
Step 9: Tighten the Lugs
Doubtfully the most important question is, have you tighten up the lugs? You have to tighten them in an X (crisscross pattern). Not in a circle when you are changing the lug and wrenching on. Rotate it again and again until it is fully tighten on the way you may not have the torque wrench so you just have to make sure it is tight and then you are good to go.
Step 10: Clean Up and Drive Home
You have to pick up all the tools and the flat tire than wash or clean your hand. Now you can drive home right away after putting back all the items in the car’s back bumper.
Conclusion
While driving after you have changed the tire and if you are driving on a tiny road then you will need to follow the rule because at that time the car will be at 50-55 speed. If you are driving faster than you will blow another tire up and you would not want that to happen. The car handling and brake will work differently so you need to feel out and be careful while driving with the new tire. Please visit BudgetMotorsReno.com and Blog.BudgetMotorsReno.com