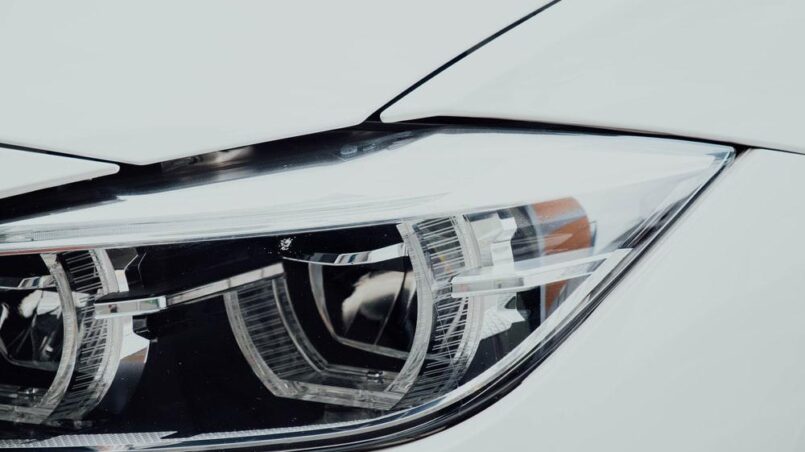
When you drive at night or in an area that contributes to low visibility, your headlights need to provide you with enough light so you can travel without any mishaps. You need to take more precautions than just checking your headlight bulb if you want proper visibility. If your headlights aren’t working to their fullest, it’s because of the fog on their lenses. Let’s understand what foggy headlights are and how you can clean them on your own effectively.
What are Foggy Headlights?
If your headlights don’t shine as bright as they used to, they may have gotten foggy. With foggy headlights, you may also notice that their light has turned yellowish and almost murky.
There are some scientific reasons behind your foggy headlights. Most lenses in new headlights have a thick plastic construction. These are different from traditional headlights you would see in old cars. Plastic-based lenses are durable and scratch-resistant. However, as time passes, these lenses’ outer layer starts degrading and breaking down after constant exposure to UV light from the sun. The lens then absorbs blue light from the bulbs, which turns the light yellow and less potent. The good news is that you can easily clean foggy headlights.
Reasons behind Foggy Headlights
- Oxidation
When acrylic headlights are exposed to UV light, they start oxidizing. Headlight lenses come with a coating to prevent such a reaction. However, when the coating wears off, the sunlight turns the plastic yellow.
- Flying Debris
While driving, your vehicle’s headlights suffer from wear and tear because of road salt, gravel, and other debris. They start to damage your headlight lens’s top coat and create scratches and pits on your headlight. When this happens, your headlights become foggy and cloudy.
- Dirt and Chemicals
Over the years, dirt, along with some chemicals, creates a thin layer on your headlight lens. This layer dims the light coming from the bulb and makes your headlight foggy.
- Water Vapor
Headlights have a watertight seal but wear and tear break the seal. Condensation will start to form in the lens, and you cannot wipe it straight away. The light scatters when it falls on water droplets. This impairs your nighttime visibility.
Benefits of Headlight Restoration
Restoring your headlight will enhance the look of the vehicle and increase the safety levels when you drive during nighttime. It doesn’t matter if your headlights are cloudy or oxidized; you can seek a professional’s help. However, you can also clean your headlight on your own using the following easy methods. Many people do not know that their headlights are dim because of the lens; they think changing the bulb will solve their problems. However, this is not the case with dim, dull, and yellow light. By restoring your headlight, you will be able to see properly during night time, which reduces your risk of accidents.
Step 1: Buy What You’ll Need
The first thing you need to make sure of is that you have all the equipment you need to restore the light at home. The best thing you can do is grab a restoration kit especially available for your headlight. This kit will contain all the materials you need to clean your headlight lens.
You can buy this kit from any popular hardware shops or over the internet. While searching for the kit on the internet, make sure that the product has good reviews. Also, ensure that the restoration kit contains all the instruments you need.
Of course, you can always purchase items individually rather than an entire kit. This will be better if you already have some items from the list below. Secondly, this option lets you choose different brands for the items, depending on what you prefer. For starters, you need to buy some pieces of wet or dry sandpaper. It would be better to purchase three kinds of sandpapers with 3000, 2000, and 1000 grits. You need to buy some paste wax, blue painter’s tape, polished compound, UV sealant, and microfiber towels for cleaning purposes.
Step 2: Get Your Headlights Clean
Start by washing your headlight lenses with water and car soap. You also need to wash the surrounding area because you will be sticking some tape to surround the next step’s lens.
Step 3: Tape off the Headlights
When sanding the headlights, you need to make sure you only sand the headlights and avoid damaging the surrounding trim or paint. Hence, you must use painter’s tape to cover the headlight lens’ surroundings to protect the rest of the area. No matter, how experienced you are with sandpaper, you may slip your hand accidentally. Painter’s tape can help protect your car’s paint. You can comfortably sand out the edges of the headlight lens when you have tape all-round the lens.
Step 4: Sand Away
This is the most satisfying step when restoring the headlight lens on your own. It is also the most essential. The sanding process will be the same, whether you have materials or the entire kit.
First, you need to start by using the abrasive sandpaper of all. If you bought sandpaper with three different options such as 3000, 2000, and 1000, you need to pick the sandpaper with the lowest grit – that’s 1000. Now, you need to wet the lens of the headlight and the sandpaper. Then, sand the lens in horizontal and straight movements. The entire time, you need to sand in a similar direction with 1000 grit sandpaper. Keep the surface wet at all times. If it dries, pour some water by hand or with spray. If the lens is not wet, you risk scratching on the lens because grit particles will buildup. Make sure to take care during this step for great results. Hence, do not hesitate to spend five to ten minutes of sanding.
After this, repeat the same process with less abrasive papers. After using the 1000 girt, repeat the process with 2000 grit and then 3000 grit. But before changing the grit, you need to clean the lens. The only difference other than the girt of the paper would be your stroking direction. With the first paper, you were stroking in horizontal directions. Stroke diagonally with the second paper, and with the third one, you need to switch to the opposite diagonal direction than the second one. Ensure that the lens and the paper are wet at all times. If you cannot find a spray bottle, use a hose. No matter what you use, the main idea is to keep the paper and the lens wet.
Step 5: Polish and Wax
Now, it’s time to check how you did in the previous step. For that, wipe off your headlight and keep it dry. You will notice an immense change in the headlights. Squeeze some polishing compound on a microfiber towel and make sure the towel is clean. Now rub the polish on the lens in a circular motion. You need to keep rubbing for several minutes. If you already have an orbital buffer, you can complete this step rather comfortably. But do not buy one if you do not have it at home. Once the lens is clear, you need to wax the lens. Waxing will clean the lens and protect it until the final step.
Step 6: Use UV sealant
As you have removed all the old oxidized sealant while you were sanding, you have to apply a new one. If you skip this step, your hard work will go to waste after some time as the sealant protects the lens from hazing.
In this step, you need to wet the paper towel and apply the sealant with wide strokes. Remember to cover the whole lens. Follow the instructions on the sealant kit for better results. But if the instructions are not there, you need to apply a single layer of sealant. Park your car in a dry place to cure the sealant layer. If you follow all the instructions, you will get the best results.
Step 7: Testing
If you complete all the steps and still don’t see much change, go through all the steps again. However, in some cases, the headlight lenses are in such bad shape that you need to hire a professional clean it or even replace the lens.
Conclusion
By following the above method, you can clean your headlights in a few steps. To preserve your headlight lenses, follow these tips:
- Park your car under a tree or in a parking garage – anywhere your headlights don’t face UV exposure
- Wash your car and clean chemicals and dirt from the lens every three months to avoid foggy headlight
- You can also remove early signs of foggy headlights when the lenses turn bit yellow: polish the headlights when these signs start appearing